¶ Overview
The Snap!Bridge example program provides an easy way to interface between MicroBlocks and Snap! projects via a USB-serial connection. It only works in browsers that support the WebSerial API: currently, just Chrome and Edge.
Although the program includes support for features of the MakerBit and Hyperduino shields, it can be used to get sensor values from a micro:bit or interact with the pins of other boards.
The program can also be extended to support the features of other boards. For example, we plan to add support for the Roger Wagner's MakerPort board (latest evolution of the MakerBit and Hyperduino) when that becomes available.
¶ Setup
Communications between Snap! and MicroBlocks requires code on both sides to send and receive data. The MicroBlocks program is "Snap!Bridge", one of the example programs that comes with MicroBlocks (in the "Other" folder). The Snap! program is "MicroBlocks Bridge v1.3" linked below.
¶ Preparing the board
Prepare the board (e.g. a micro:bit) by first installing the MicroBlocks firmware. If you are new to MicroBlocks, see Get Started.
Run MicroBlocks, either in a Chrome or Edge browser or download and run the stand-alone app. Plug in the board. The stand-alone app should connect to the board automatically when it is plugged in. If running in the browser, click the USB icon and select the board to connect. A green circle should appear behind the USB icon showing that the board is connected.
Select "open" from the File menu (file icon), click the "Examples" shortcut button, then open the "Other" folder. Select "Snap!Bridge" and click the "Open" button.
Wait a few seconds for the program to load onto the board. You'll see a circular progress indicator to the left of the green start button as it is loading. When loading is complete, exit the MicroBlocks app or close the MicroBlocks tab in the browser.
Finally, unplug the board from the USB cable. That will ensure a clean start when the board is plugged in again.
The board is prepared!
¶ Running the Snap! program
Dowload the file "MicroBlocks Bridge v1.3.xml" (linked below).
In a Chrome or Edge browser, go to the Snap! website. Click the "Run Snap!" button. Drag and drop the file "MicroBlocks Bridge v1.3.xml" onto Snap! to load it.
Make sure that MicroBlocks has been closed, then plug in the board.
Click the green flag in Snap! to run the program. You'll get a browser dialog box asking which board you want to connect to. There may be several COM ports listed, but it should be obvious from the name which one is your board. Select that board and click the "Connect" button.
If the connection is made you will see a talk bubble in Snap! like this:

That indicates that Snap! has successfully connected to MicroBlocks. It also tells you the version of the SnapBridge program (1.0) and what type of board ("micro:bit v2") it is running on.
You'll see several variable watchers on the stage for some of the data being streamed from the board. For example, if the board is a micro:bit, you will see watchers for sensors such as tilt, light, and temperature. Open the Variables category in the blocks palette to see other data that is reported, including arrays of values for the digital and analog pins.
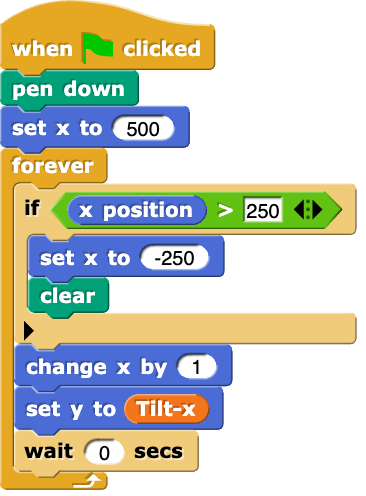
¶ Example: Graphing the tilt-x sensor
You can now write Snap! scripts that use sensor and pin values from the board. Here is a simple script that graphs the Tilt-x sensor value.